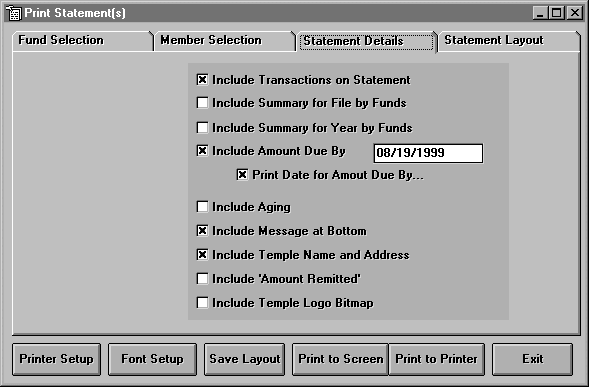
Click on the Statement Details tab on the Statements Screen to bring up the following screen:

Include Transactions on Statements
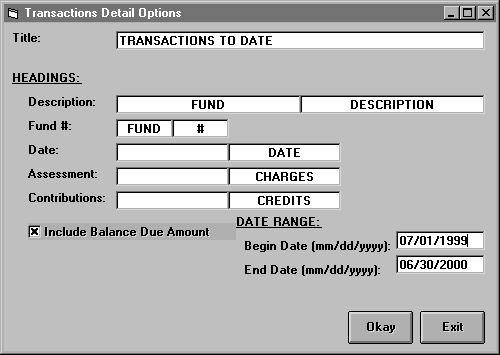
The "Include Transactions On Statements" option allows you to set a date range for the transaction detail to be included on the statement. If you only want a summary of transactions by fund number, do not select this option. To view the selection screen for this option, click it once to remove the mark and click again to see the following screen:

The top part of this screen allows you to change the headings for the columns. You can change CHARGES to PLEDGES if needed, such as for statements for the Building Fund. Click "Include Balance Due Amount" to list a balance due at the end to the transaction detail section. Type in the Date Range in mm/dd/yyyy format. Click <Okay> to record these changes. Click <Exit> to return to the statement screen and click <Save Layout> to permanently save these changes.
Include Summary for File by Funds
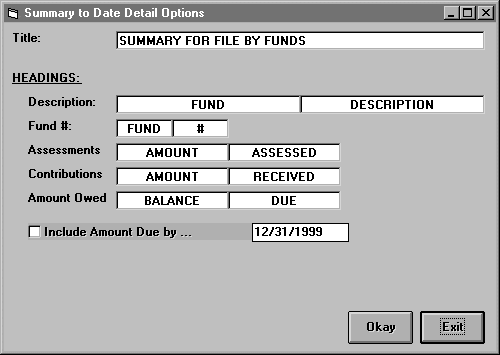
This option allows you to print a summary listing what has been assessed, received, and what is due by fund number. It also has an ending cutoff date so that if you want to display a summary of transactions up until the detail begins (changing the title to "Summary of Beginning Balance" for example, you would use this option.) If this option is checked, un-check it and mark again to bring up the following screen:

Again, you can change the headings if you would like. The ending cutoff date follows the Include Amount Due by box. Type in a cutoff date using mm/dd/yyyy format. You can include the Amount Due By in this summary section by checking this box.
Click <Okay> to record your changes. Click <Exit> to return to the Statements screen. Click <Save Layout> to permanently save these changes.
Include Summary for Year by Funds
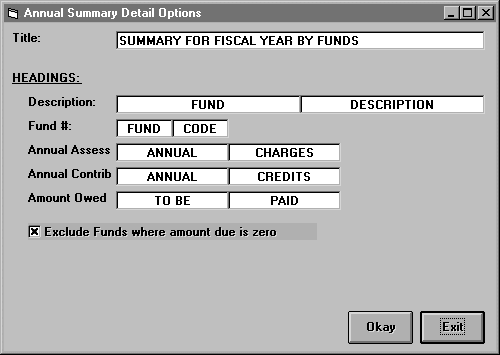
The "Include Summary for Year by Funds" option prints a summary for the entire year of assessments, contributions, and total due by the end of year for each fund. The default cutoff date is the end of the fiscal year, unlike the "Summary for File by Funds" option. If this option is already marked, un-check it and re-check it to bring up the following screen:

This option allows you to change the headings and to Exclude Funds if the Amount Due is Zero. To do so, check this box. Click <Okay> to record these changes. Click <Exit> to return to the Statement Screen. Click <Save Layout> to permanently save these changes.
Include Amount Due By
Check this option if you want the Amount Due By to show at the end of the statement. Enter the cutoff date if mm/dd/yyyy format. You can either leave off the date and print:
Amount Due: $50.00
or you can check the option to include the date so that it will print:
Amount Due by 6/30/2000: $50.00
Include Aging
If you select to include aging on the report, a screen will appear allowing you to choose the aging periods that you want to use. You can include aging for 30, 60, and 90 Days; 1, 2, and 3 years; or create your own periods by selecting the "Enter Period" option. When you've finished selecting the Period, click <Okay> to record your options. Click <Exit> to return to the Statement Screen. Click <Save Layout> to permanently save this change.
Include Message at Bottom of Statement
If you select to "Include a Message at the Bottom of Statement" then a screen will appear allowing you to enter up to 5 lines of text for the message. Each line may be up to 50 characters long.
When you've finished entering the message that you want to appear at the bottom of the last page of every statement click <Okay> to record your message. Click <Exit> to return to the "Statements" screen. Click <Save Layout> to permanently save your message.
Include Temple Name and Address
If you select "Include the Temple Name and Address" on your statements, a screen will appear allowing you to enter the number of spaces from the left edge you would like to place the name and the number of lines from the top of the page. If this option is already selected, click it off and back on again to enter this information. When you've finished, click <Okay> to record your formatting options. Click <Exit> to return to the Statement Screen. Click <Save Layout> to permanently save this change.
Include Amount Remitted Field
If you select to "Include Amount Remitted" on the Statement, a screen will appear allowing you to enter the number of lines from the top of the page that you want the words "Amount Remitted" to appear. This should not be greater than the "End of Header Section" line explained in Statement Layout. Next, select whether you would like the image to be Left Justified, Right Justified, or in the Center. Finally, select a style from the options depicted.
When you have made your choices, click <Okay> to record them. Click <Exit> to return to the "Statements" screen. Click <Save Layout> to permanently save your changes.
Include Temple Logo
If you select to "Include Temple Logo" a screen will appear allowing you to enter the path and filename for the ".BMP" file that contains your logo. The logo will be displayed on the top of the screen so that you can be sure that you have the correct ".BMP" file. Click <Browse> to scroll through the files and folders on your computers to find the ".BMP" file. Click <Okay> to record the Path. Click <Exit> to return to the Statements screen. Click <Save Layout> to permanently save your changes.